Getting Started
To begin using vMix Replay, first add all of the cameras you will be using to vMix as inputs.
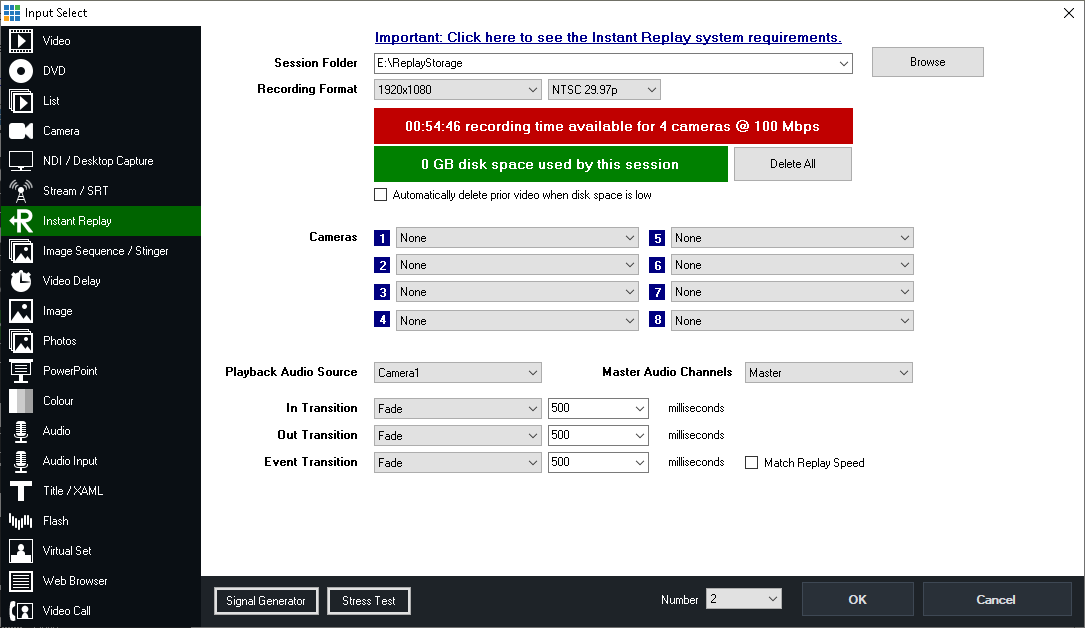
Next, click Add Input and select the Instant Replay tab as shown below:
Important: Click here to see the Instant Replay system requirements.

Session Folder
This is the location where all Instant Replay recordings will be saved.
This must be dedicated SSD based storage
After selecting a folder, vMix will display an estimated recording time based on the selected recording format and bit rate.
Recording Format
The recording format must match all camera sources that will be used.
Delete All
This button will delete all video, audio and events within the selected session folder while keeping all replay settings intact, including music and tags.
This allows you to use the same session folder and configuration for each game.
Automatically delete prior video when disk space is low
vMix Replay automatically splits each camera recording every 20 minutes.
If disk space is running low, vMix Replay can automatically delete the earliest 20 minutes of the recording to continue.
Note that any events that occurred in this deleted video will be lost.
If this option is left unticked, vMix Replay will automatically stop recording and notify the user that the disk space is low.
Cameras
Select any Camera input already added to vMix here, if you add an input later on you can revisit this configuration window by clicking the cog icon in the Instant Replay Controller window.
Output is also supported as one of the camera inputs, and will record all video and audio playing in the vMix output just like a standard recording.
Playback Audio Source
This is the audio source vMix will use when playing back events.
Master can be selected which represents the master audio mix at the time the event being played back occurred.
Follow can be used to automatically switch the audio to the embedded audio of the active camera angle.
Master Audio Channels
Selects the audio channels to record from the Master audio mix.
By default this is the standard stereo master audio but can also be an audio bus or a combination of two buses (for 4 channels total)
In Transition
Select the transition to use when playing back events. This can be a standard transition, or optionally any stinger that has already been configured.
Out Transition
Select the transition to use once the event playback has completed.
Event Transition
Select the transition to use between each event when more than one event is selected for playback, such as in a highlight reel.
Match Replay Speed
When ticked, any transitions between events will be slowed down to match the current replay speed.
(For example a 200ms transition will become 400ms when the replay speed is 50%)